
basit.adhi.prabowo
Squid adalah caching proxy untuk Web yang mendukung HTTP, HTTPS, FTP, dan lainnya. Squid mengurangi penggunaan internet dan meningkatkan waktu respon dengan cara caching dan menggunakan kembali halaman yang sering diminta. Squid memiliki kontrol akses yang ekstensif dan dapat dibuat sebagai server pemercepat (accelerator). Squid dapat berjalan di sebagian besar sistem operasi yang tersedia, termasuk Windows dan berlisensi di bawah GNU GPL.
Squid digunakan oleh banyak ISP diseluruh dunia untuk melayani penggunanya dengan kemungkinan terbaik akses web. Squid mengoptimalkan aliran data antara klien dan server dengan meningkatkan performa dan cache konten yang sering diakses untuk menghemat internet.
Begitu banyak situs web menggunakan Squid untuk meningkatkan kemampuan distribusi kontent secara drastis. Squid dapat mengurangi kerja server dan meningkatkan kecepatan distribusi konten kepada klien. Squid hanya menyalin konten yang digunakan saja, daripada secara tidak efisien menyalin semua. (saduran dan terjemah http://www.squid-cache.org/ tanggal 27 Oktober 2016)
[The Squid systems] are currently running at a hit-rate of approximately 75%, effectively quadrupling the capacity of the Apache servers behind them. This is particularly noticeable when a large surge of traffic arrives directed to a particular page via a web link from another site, as the caching efficiency for that page will be nearly 100%.– Wikimedia Deployment Information. (http://www.squid-cache.org/ tanggal 27 Oktober 2016)
Transparent/Intercept Proxy
Interception Caching memiliki banyak nama, yaitu: Interception Caching, Transparent Proxying, URL rewriting, SSL-Bump dan Cache Redirection. Interception Caching adalah proses koneksi HTTP klien yang dibelokkan ke server proxy tanpa diketahui oleh klien atau tanpa ada konfigurasi pada klien.
Perbedaan Konsep Squid Sebelum Versi 3.2 dan Versi 3.2 ke atas
That is no longer permitted since Squid-3.2. The DNAT can only happen once, and that must be on the Squid machine so Squid can lookup the NAT tables and unmangle the original dst-IP. You need to use routing rules on the Mikrotik (or tunnel sometimes works too) to deliver the original client generated packet to the Squid machine without NAT changing the dst-IP:port details (SNAT is fine, but will cause lies about client IP in the access.log). (Amos Jeffries, http://lists.squid-cache.org/pipermail/squid-users/2015-June/004243.html, disalin tanggal 27 Oktober 2016)
Dari penjelasan Amos tersebut di atas, perbedaannya adalah terletak pada pemberian NAT, dapat dilihat pada tabel di bawah ini:
| < Squid 3.2 | >= Squid 3.2 |
| NAT diberikan di Mikrotik | NAT diberikan di Server Squid, Mikrotik hanya routing saja |
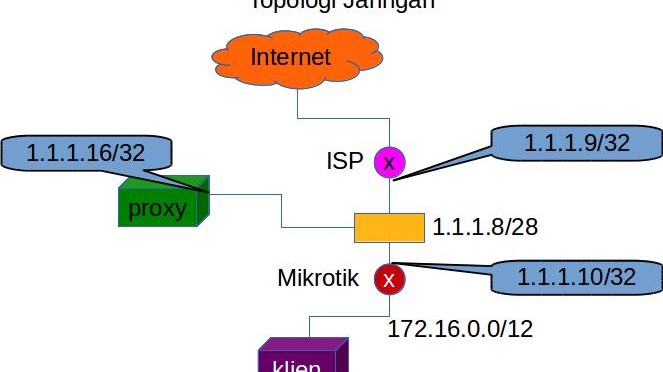
Topologi Jaringan
Topologi jaringan yang digunakan pada tutorial adalah seperti pada gambar di bawah ini:
 topologi-jaringan
Keterangan:
- Jaringan klien menggunakan jaringan kelas B, dengan IP 172.16.0.0/12 (bisa juga diganti kelas C, misalnya 192.168.1.0/24).
- Jaringan publik menggunakan alamat 1.1.1.8/28 (berisi 16 alamat), dimana:
- IP mikrotik 1.1.1.10,
- IP server squid 1.1.1.16,
- Gateway ke internet 1.1.1.9,
- 1.1.1.8 sebagai alamat jaringan dan 1.1.1.23 sebagai broadcast
Dari konfigurasi jaringan tersebut, terlebih dahulu kita buat rule, apa saja yang dibelokkan trafiknya ke server squid, yaitu: yang dibelokkan hanya trafik dari klien ke internet. Trafik dari klien ke klien tidak dibelokkan dan trafik dari klien ke server juga tidak dibelokkan. Internet adalah trafik yang mengarah ke gateway ISP (1.1.1.9).
Setting Router Mikrotik
Sebelum melakukan konfigurasi NAT atau routing, telebih dahulu dibuat address list untuk mengakomodir rule trafik yang dibelokkan ke server squid, yaitu address list untuk klien dan address list untuk internet (no gateway) seperti di bawah ini:
/ip firewall address-list
add list=c.client address=172.16.0.0/12 disable=no
add list=c.nogateway address=1.1.1.10-1.1.1.22 disable=no
add list=c.nogateway address=172.16.0.0/12 disable=no
Selanjutnya, buat mangle untuk menandai paket dan memproses NAT atau routing seperti di bawah ini:
| < Squid 3.2 | >= Squid 3.2 |
| /ip firewall mangle add chain=prerouting action=jump jump-target=jump-toproxy-u protocol=tcp src-address-list=c.client dst-address-list=!c.nogateway dst-port=80,8080 disable=no add chain=jump-toproxy-u action=mark-connection new-connection-mark=Conn-toproxy-u passthrough=yes disable=no add chain=jump-toproxy-u action=mark-packet new-packet-mark=toproxy passthrough=no connection-mark=Conn-toproxy-u disable=no add chain=forward action=accept connection-mark=Conn-toproxy-u disable=no | /ip firewall mangle add chain=prerouting action=jump jump-target=jump-toproxy-u protocol=tcp src-address-list=c.client dst-address-list=!c.nogateway dst-port=80,8080 disable=no add chain=jump-toproxy-u action=mark-routing new-routing-mark=route-proxy passthrough=yes disable=no add chain=jump-toproxy-u action=mark-packet new-packet-mark=toproxy passthrough=no routing-mark=route-proxy disable=no add chain=forward action=accept routing-mark=route-proxy disable=no |
| /ip firewall nat add chain=dstnat action=dst-nat to-addresses=1.1.1.16 to-ports=3128 protocol=tcp connection-mark=Conn-toproxy-u disable=no | /ip firewall nat add chain=srcnat action=accept to-addresses=1.1.1.16 to-ports=3128 protocol=tcp routing-mark=route-proxy disable=no |
| /ip route add dst-address=0.0.0.0/0 gateway=1.1.1.16 gateway-status=1.1.1.16 reachable via ether0 distance=1 scope=30 target-scope=10 routing-mark=route-proxy disable=no |
Setting Server Squid
| < Squid 3.2 | >= Squid 3.2 |
NAT | |
| (tidak ada) |
(disalin dan disesuaikan dari http://wiki.squid-cache.org/ConfigExamples/Intercept/LinuxDnat) |
squid.conf | |
| http_port 3128 transparent | http_port 3127 http_port 3128 intercept |
Apabila menghadapi kendala dengan mailYahoo versi baru, maka bisa dicoba menggunakan mailYahoo klasik dengan alamat https://mg.mail.yahoo.com/neo/b/launch
2 replies on “Transparent (Intercept) Proxy Dengan Squid 3.x dan Mikrotik Pada Ubuntu”
hello,
i think this command is wrong.
add chain=srcnat action=accept to-addresses=1.1.1.16 to-ports=3128 protocol=tcp routing-mark=route-proxy disable=no
when you select accept there is no to-addresses option in mikrotik.
I run command export compact and this is the code (I change the real IP, of course):